Good to know – myths about the green coffee
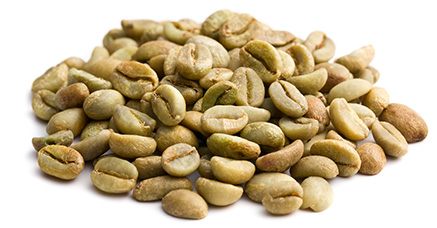
There’s no shortage of green coffee offers online, often claiming various health or weight-loss benefits. In our opinion, green coffee is not suitable for consumption – it tastes awful (like chlorophyll, a mix of mud and straw, with a hint of green tea) and doesn’t offer any health benefits that roasted coffee doesn’t already provide (such as antioxidants or metabolism support).
Green coffee beans are extremely hard and not brittle – do not try to grind them in a regular coffee grinder. They require professional, industrial mills or a mortar and pestle (or even a hammer) – and a lot of patience.
We’ve added green coffee to our offer for people who have home coffee roasters or want to experiment with roasting beans in a pan, an oven, or even over the open flame of a cozy campfire!
While we don’t believe this kind of coffee will actually taste good to you, we still encourage you to experiment! Roasting coffee at home can be a lot of fun and will definitely fill your home with an amazing aroma that can linger for days.
However, it’s important to keep in mind a few key aspects of home roasting, which we’ve outlined below. By following these guidelines, you’ll avoid unpleasant surprises and disappointments – and who knows, you might enjoy your home-roasted coffee so much that you’ll stop ordering roasted beans from us!
Home roasting – how to roast coffee at home?
Below you’ll find a simple, universal guide for roasting coffee at home. It’s a great starting point – you can adjust the specific parameters depending on how you like the final result.
- Preheat your pan or oven to around 200°C (though we don’t recommend using an oven – more on that below), and do not use any oils or fats.
- Spread the green coffee beans evenly across the surface so that all beans are in direct contact with the pan or oven tray – do not stack them in layers.
- Stir the beans gently and continuously to ensure even roasting.
- After about 4–5 minutes, you’ll notice the characteristic smell of roasting coffee, and the beans will begin to lightly brown.
- After another 2–4 minutes, you’ll see the silver skin (a thin outer layer) start to come off the beans. Try to remove or blow it away as it appears – it’s highly flammable.
- The beans will continue to darken, becoming increasingly brown – remember to keep stirring gently and consistently.
- After around 15–18 minutes of roasting, you’ll hear the holy grail of all roasters – the “crack”, a popping sound caused by the internal pressure breaking the beans’ surface. From this point on, you control the final flavor. The beans will almost double in size.
- Once you’ve reached your desired roast level, transfer the beans into a heat-resistant container (a large steel pot works great) and shake or toss them vigorously – the goal is to cool them down to room temperature as quickly as possible. Do not use a fridge or freezer – if you don’t cool the beans quickly, they could catch fire on their own!
- Let the cooled beans rest in a well-ventilated place for at least 3–4 days – they need time to degas.
- Enjoy your homemade roasted coffee!
A Few Useful Tips and Insights for Home Coffee Roasting
- Constant Stirring is Key: If you leave the beans sitting on the pan for even 30 seconds, they’ll burn or roast unevenly at best.
- If you’re using a pan, the best options are large, heavy, thick-bottomed pans (ideally cast iron) with high sides. Avoid small or flat pans like crepe pans – they don’t distribute heat well and make stirring difficult.
- If you’re using an oven, make sure it has convection (fan-assisted) mode, and regularly check for and remove the silver skin (the thin husks peeling off the beans).
- Resting the Beans: Roasted beans should rest for at least 2-3 days to fully develop their flavor. However, for curiosity’s sake, try them immediately after roasting and again after two weeks – you’ll understand why they need that resting period through sensory experience.
- Document Your Roasts: Record the entire roasting process – what happens in each minute and what you do. Each coffee bean roasts differently, produces different aromas, and produces varying amounts of silver skin. These notes will make it easy to revisit previous roasting attempts and adjust your procedure based on what you’ve learned.
- Stop Roasting Just Before Your Desired Color: Remember that beans continue roasting after being removed from the pan. Stirring and rapid cooling are essential to prevent over-roasting.
- Home coffee roasting is an endeavor that’s intimately tied to the intense aroma of roasting, akin to the scents emanating from a traditional bakery. We adore this aroma, but it may not be to everyone’s liking, and you should be prepared for the need to thoroughly ventilate your home.
- Avoid letting the coffee roast too long or burn. Aside from being unusable, overly roasted (or burning) coffee emits such a dreadful odor that it can be unbearable to stay in the room and will linger for an extended period.
- If you accidentally overroast the coffee, promptly douse it with water (and discard it). Coffee beans brought to around 200°C without consistent stirring and cooling can self-ignite.
Home Coffee Roasting Equipment
If you find the home coffee roasting process enjoyable and investing thousands euros is not problem, you can explore devices designed for home roasting.
These devices typically start at a few hundreds EUR, but more expensive options are also available. Lower-end models provide fewer options and require close monitoring during operation.
We discourage experimenting with toasters, popcorn machines, thermo mixers, etc. While initial attempts may yield success, keep in mind that the manufacturers of these devices did not design them for coffee roasting, and they may react differently to prolonged exposure to high temperatures.
Home coffee roasters are usually electric (230V) and have a capacity of several hundred grams. They eliminate the need for constant stirring and remove silver skin, collecting it in a dedicated container. The pricier models offer more control over the roasting process.
It’s challenging to compare such devices to regular, artisanal coffee roasting machines with cast iron drum chambers, like the ones we use in our roastery (for those who paid attention in physics class, you can guess why). However, they certainly have a significant advantage over pans or popcorn machines, offering greater control over roast time and temperature, allowing you to influence and regulate the coffee’s roasting level.
Back to top ▲